Home Phone FAQs
Browse our detailed home phone FAQs below, or
Download The Telephone Feature Guide
How do I access the Customer Portal?
A number of features on your telephone service are available via the vSuite Customer Portal. This online portal can be accessed using your eSuite login credentials. If you have misplaced your credentials, you will need to contact Technical Support for assistance. Below are instructions on how to login to the vSuite Portal.
Visit the vSuite Customer Portal and login. Once you login, you will be at the Portal Main page.
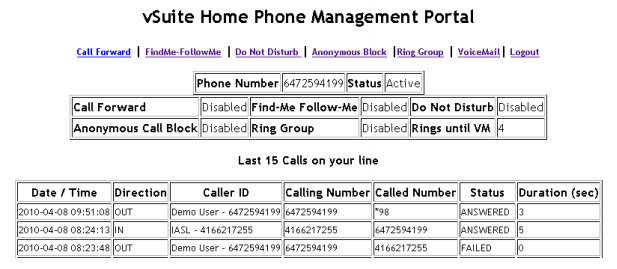
The Main page provides you with a quick view of your current telephone status, along with the status of a number of features. The page also provides a list of the last 15 calls to and from your phone line.
How do I set up call forwarding?
The call forwarding feature allows you to forward your telephone to another phone number such as your cell phone. While the call forwarding feature is enabled all calls to your vSuite telephone number will be sent directly to the forwarding telephone number. Calls will NOT ring on your home phone, and calls that are not answered on the call forwarded number will also NOT be able to leave you a voice mail on your home phone voicemail.
The feature may be enabled via the Home Phone Portal as well as via a “*” feature code from any telephone connected to the Home Phone service. Instructions on how to configure call forwarding using either method are below.
Setup via Home Phone Portal:
Activate:
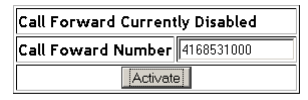
- Login to the home phone portal, from the main page. Click on the link labeled “Call Forward” (near the top left of the page).
- The call forwarding screen will be presented to you. On this screen ,enter the 10 digit local number where you would like to have all calls forwarded and then click the activate button.
- After you have clicked “Activate’, the screen will refresh and the call forwarding will be active until you remove it.
Or, from any phone connected to your vSuite service:
- Dial “*72”
- You will be prompted to enter the telephone number you wish to call forward your telephone service to. Once you have entered the 10 digit local number, press the # key. The system will read you back the number and ask you to confirm that it is correct.
- Once you have confirmed, the system will tell you the call forwarding is active. From that point any calls to your vSuite phone service will be forwarded to the number you entered in step #2.
Remove:
- Login to the home phone portal, from the main page. Click on the link labeled “Call Forward” (near the top left of the page).
- The call forward screen will be presented to you. On this screen click the “Remove Forward” link.
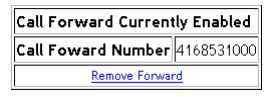
- After you have clicked “Remove Forward” the screen will re-fresh and call forwarding will now be disabled.
Or, from any phone connected to your vSuite service:
- Dial “*73”
- The system will tell you the call forwarding has been removed and now all calls to your vSuite phone service will ring at your home again.
What is call waiting and how do I use this feature?
Call waiting allows you to receive another incoming call while you are already on the phone. You will hear a beep in your ear when the second call arrives. If your phone supports caller ID, you will also be able to see the caller ID information of the second call. If you wish to answer the second call, press the “flash” button on your phone and the first call will be placed on hold and you will then be connected to the second caller. If your phone does not have a “flash” button,you may also press the receiver hang-up button. You may use the “flash” or “hook” button to toggle between the two calls.
What is the last call return feature and how do I use it?
The Last Call Return feature allows you to find out the last number that called you. The feature is accessed using a “*” code and can be accessed via any telephone connected to the vSuite service. To use this feature simply dial “*69” on your telephone. If the last caller to your number had their caller ID blocked, the system will simply say that the number is unavailable.
How do I use 3 way conference calling?
With your vSuite telephone service you are able to create a 3 way conference call. The conference call may consist of yourself and two external telephone numbers.
Create a conference call:
- Call the first person you want to create a conference with
- Once your first call is connected, press the “hook” or “flash” button on your phone; you will hear dial tone again. Dial the number of the second person you want to call.
- Once you are connected to the second caller press the “hook” or “flash” button again and all of you will now be entered in to a 3 way conference call.
- When you are done, hang up the phone and the calls will be disconnected.
How do I transfer a call?
The Call Transfer feature allows you to transfer a call that you are on to another telephone number. For example, you can transfer the call you are on from your home phone to your cell phone without having to disconnect and call back.
To use this feature simply press the “hook” or “flash” button on your phone. When you hear the dial tone, dial the number you want to transfer the call to. When the phone you are calling is answered, hang up the home phone and the call will be transferred.
How do I prevent the person I'm calling from viewing my phone number on their Caller ID?
Caller ID Block allows you to place a call and block your caller ID information so that the person you are calling will not see your telephone number. This feature is enabled at the time of the call and is only active for the call you are making. You must use a “*” feature code ahead of your dialing to enable this feature.
To block your caller ID simply dial “*67” ahead of the number you’re dialing. For example if you wanted to call 416-555-1234 and block your ID you would simply dial “*67-416-555-1234”. There is no need to wait or pause between *67 and the number you want to call.
How do I block incoming calls from anonymous or private phone numbers?
Your vSuite phone service allows you to block all incoming calls where caller ID information is unavailable. Calls would typically show up as “Private” or “Anonymous” on your phone’s display. When you activate this feature, anyone calling without caller ID information will be told that you do not accept calls without caller ID information and they will then hear a busy tone.
This feature may be activated via the Home Phone Portal or via a “*” feature code from any phone connected to the vSuite service.
Activate:
- Login to the home phone portal, from the main page. Click on the link labeled “Anonymous Block”.
- You will be taken to the Enable Anonymous Call Block screen, simply click on the button labeled “Enable Anonymous Call Block”; the screen will re-fresh and the caller block will now be enabled.
Or, from any phone connected to your vSuite service:
- Dial “*76”
- You will hear the system tell you that the feature is enabled; from that point forward the call block feature will be turned on.
Remove:
- Login to the home phone portal, from the main page click on the link labeled “Anonymous Block”.
- You will be taken to the Disable Anonymous Call Block screen; click on the button labeled “Disable Anonymous Call Block”; the screen will re-fresh and the caller block will now be disabled.
Or, from any phone connected to your vSuite service:
- Dial “*77”
- You will hear the system tell you that the feature is disabled; all calls will now ring to your home phone service.
How do I set my phone to "Do Not Disturb"?
The “Do Not Disturb” feature will stop calls from ringing on the telephones connected to the vSuite service, and send the caller directly to voicemail. If you do not have voicemail with your vSuite service, the caller will be told that you are unavailable and please call back again later.
This service can be enabled via the Home Phone Portal or a “*” Feature code.
Setup via Home Phone Portal:
- Login to the home phone portal, from the main page click on the link labeled “Do Not Disturb”.
- You will be taken to the Do Not Disturb screen; Click on the button labeled “Enable Do Not Disturb”, the screen will refresh and all calls will no ring directly to voicemail and not to your phones.
Or, from any phone connected to your vSuite service:
- Dial “*78”
- You will hear the system tell you that the feature is enabled; from that point forward all calls will no longer ring on your phones and will be sent directly to voicemail.
Remove:
- Login to the home phone portal, from the main page click on the link labeled “Do Not Disturb”.
- You will be taken to the Do Not Disturb screen, simply click on the button labeled “Disable Do Not Disturb”, the screen will re-fresh and all calls will now ring on your telephones again.
Or, from any phone connected to your vSuite service:
- Dial “*79”
- You will hear the system tell you that the feature is disabled; all calls will now ring to your home phone service again.
How do I set the system to forward calls to my other phone numbers when I don't answer my home phone?
The Find-Me Follow-Me feature allows you to define up to 3 telephone numbers that the system can try to reach you on if you do not answer your home phone. For example: if someone calls you on your vSuite service and you are not home and do not answer the phone the system will try to contact you on up to 3 phone numbers. The caller will be asked to record their name; and when you answer the phone, the system will ask you if you wish to accept a call from the caller. If you elect to answer, you will be connected. If you do not want to answer, the call will be sent to your vSuite voicemail.
This feature can only be enabled and disabled via the Home Phone Portal.
Setup via Home Phone Portal:
- Login to the home phone portal, from the main page click on the link labeled “Findme-Followme”.
- You will be taken to the Find-Me Follow-Me configuration screens. If you do not currently have any numbers defined, you will see a screen similar to the one below. This screen shows the feature as disabled and allows you to add the first number.
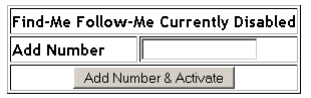
- Enter the first number you want the system to try to reach you on and then click “Add Number & Activate”. Once you have at least one number defined the feature will be enabled. The screen will now refresh and you will see a screen similar to the one below.
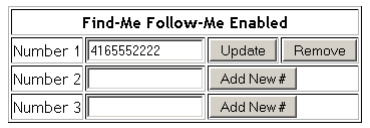
This screen shows you that the feature is now enabled and allows you to now define two more numbers. The system will try to call each number for 20 seconds each in the order they are defined. If you don’t have any other numbers to define you can simply click the “Back” button at the top of the page and you will be taken back to the portal home page.
Remove:
- Login to the home phone portal, from the main page click on the link labeled “Findme-Followme”.
- If the feature has been enabled, you will see a screen similar to the one below.
Simply click on “remove “beside each of the numbers you wish to remove and the system will no longer use that number. Once you have removed all three numbers the feature will automatically become disabled. - You will see the screen below that shows the feature is disabled once all numbers are removed.
You can now click the “Back” link at the top of the page and you will be returned to the Home Phone Portal main page.
What is the Ring Group Feature and how do I set it up?
The Ring Group feature allows you to configure up to 3 telephone numbers that will ring simultaneously when your home phone service is called. For example: if you want your cell phone to ring at the same time as your home phone rings when someone calls you then you would enable a ring group and put your cell phone number as the contact number. This feature is different than the Find-Me Follow-Me as it rings all phones at the same time including your home phone. Each remote phone will ring for 20 seconds. After that time the call will only ring on your home phone until it goes to your voicemail. When any of the phones are answered the other phones will stop ringing. Please note that if you have a voicemail on one of the remote numbers and it answers the caller will be connected to that voicemail and not to you vSuite voicemail service.
Ring Groups may only be setup via the Home Phone Portal.
Setup via Home Phone Portal:
- Login to the home phone portal, from the main page. Click on the link labeled “Ring Group”
- The feature is disabled until you define the first number. A screen similar to the one below will appear.
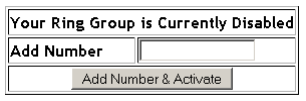
- Enter the first telephone number you wish to activate. Click on “Add Number & Activate”. The system will now enable the Ring Group and re-fresh the page to show you that the feature has been activated.
- The screen below shows you that the feature is now active and gives you the ability to add two more phone numbers to the ring group.
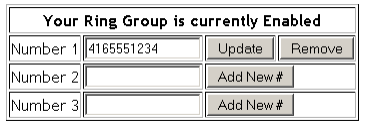
Simply enter a 10 digit telephone number and then click the “Add New #” button to activate the additional numbers.
Remove:
- Login to the home phone portal, from the main page. Click on the link labeled “Ring Group”
- The ring group page will be displaced and show you the listing of the numbers currently active in the Ring Group. You may remove one or all of the numbers from this page. If you remove all numbers, the feature will become disabled.
Once you have removed all the numbers simply click the “Back “ button and you will be taken back to the Home Phone Portal main page. - When you remove the last number the screen below will change and show you the following screen confirming the feature is now disabled.
How do I set up and use my voicemail?
The vSuite Voice Mail system allows you to receive message from callers when you are not available or do you do not answer the telephone. The vSuite voice mail system also has the ability to send a notification to you via a number of different methods when you have a new voice mail. Below you will find details on how to configure the different options associated with the Voice Mail service.
First Time Configuration
- From any telephone connected to the vSuite service simply dial “*98”, the system will prompt you for a password. If this is your first time configuration, the default password will be your telephone number.
- The system will then direct you to perform some initial setup options.
- You will be asked to select a new password; your password may be up to 10 digits in length
- You will be asked to record your greeting; this greeting will be played to callers when you do not answer the telephone.
- After step 2 is completed your voice mail will now be activated and ready to receive calls.
Receiving Messages
There are two methods to retrieve messages that are left on your voicemail; one is via the telephone using a “*” feature code and the other is via the Home Phone Portal. Both methods are detailed below.
Access via “*” feature code
- From any phone connected to your vSuite service dial “*98”, you will be prompted to enter your password.
- Once you are logged in, the system will tell you how many new messages you have and allow you to listen to them.
- Below is a list of commands available in the voicemail system and a description of what each command does.
Voice Mail Menu
- 1 – Starting playing new messages that are in your mailbox.
- 4 – While playing pressing “4” will play the previous message
- 5 – While Playing pressing “5” will repeat the current message playback
- 6 – While Playing pressing “6” will play the next message
- 7 – While Playing pressing “7” will delete the current message
- 9 – While Playing pressing “9” will allow you save the current message
- * – While Playing pressing “*” will rewind
- # – While Playing pressing “#” will fast forward
- 0 – Pressing “0” will take to the options menu
- 1 – Pressing “1” in the options menu allows you to record your personal greeting. This greeting will be played to callers when they reach your voicemail.
- 5 – Pressing “5” in the options menu allows you to change your current mailbox password.
Access via Home Phone Portal
You may also use the vSuite Home Phone Portal to retrieve your voicemail messages. In order to use the Home Phone Portal you need to login and click the “Voice Mail” button at the top of the screen. You will be taken to a screen that looks similar to the one below, this page will list all your current voice mails and allow you to play them back on your computer.
VoiceMail Notification Configuration
When you have a new message waiting in your mail box,you will hear a stuttered dial tone when you pick-up any telephone on the line. If your telephones have a message waiting indicator light, this light will also be enabled when a message is left for you.
Along with the standard method vSuite provides two additional notification methods that can be enabled and configured via the Home Phone Portal.
Voice Mail Forwarding
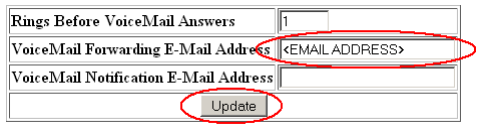
Voice Mail Forwarding allows you to specify an email address that the vSuite voice mail system will email a digital copy of the voicemail to. The voicemail can then be played on your computer. The voicemail file will be sent as an attachment to the email and will be a WAV formatted audio file.
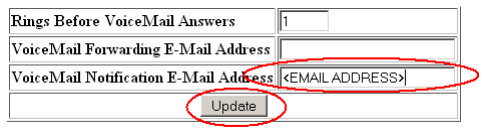
In order to enable this feature simply login to the Home Phone portal and select the Voice Mail link on the top of the page. The Voice Mail configuration screen will appear; enter your e-mail address in the field named “VoiceMail Forwarding E-Mail Address” and click the update button. To disable the forwarding, remove the address and leave the field blank and then click the update button.
Voice Mail Notification Only
Voice Mail Notification is similar to Voice Mail forwarding except that the system does not attach a digital copy of the voice mail to the email it sends. You will receive a simply email letting you know you have a new voice mail waiting along with the CALLERID and Date / Time the message was received.
To enable this feature login to the Home Phone portal and select the Voice Mail link on the top of the page. The Voice Mail configuration screen will appear. Enter your email address in the field named “VoiceMail Notification E-Mail Address” and click the update button. To disable the forwarding,remove the address and leave the field blank and then click the update button.